9일 차 회고.
오늘 토이 프로젝트 1차 발표를 했는데 총 4개의 팀이 진행하게 되었다. 다들 좋은 주제들로 굉장히 흥미로운 프로젝트를 진행해서 살짝 기도 죽었던 것 같다. 그래도 우리 팀 나름대로 열심히 할 수 있는 만큼 완성해서 포트폴리오에 작성할 수 있었으면 좋겠다. 그리고 주말 동안 깃에 대한 공부를 해야 할 것 같다.
0. 복습
0-0. MySQL 환경 세팅
0-0-1.Docker
Docker에서 먼저 서버를 활성화한다.

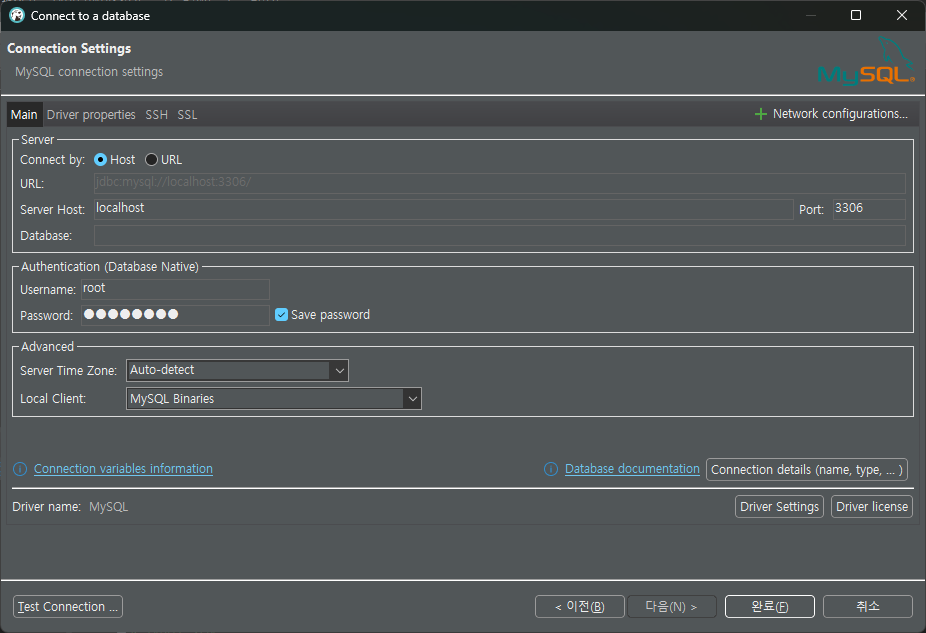
0-0-2. DBeaver
DBeaver에서 데이터베이스를 연결한다.
0-1. DDL
0-1-1. 데이터베이스 생성
show databases;			# database 목록 조회

create database dbname;		# 'dbname' database 생성
show databases;			# database 목록 조회

use dbname;			# 'dbname' database 사용
0-1-2. 데이터베이스 테이블 생성
create table student (			# 'student' table 생성
    student_id int unsigned auto_increment,	# auto_increment: 자동 증가
    student_name varchar(10) not null,
    student_address varchar(50) null,
    create_dt timestamp default now(),
    modify_dt timestamp default now(),
    primary key(student_id)
);
show tables;		# table 목록 조회
desc student;		# 'student' table 조회

create table professor (		# 'professor' table 생성
    professor_id int unsigned auto_increment,
    professor_name varchar(10) not null,
    create_dt timestamp default now(),
    modify_dt timestamp default now(),
    primary key(professor id)
);
show tables;		# table 목록 조회
desc professor;		# 'professor' table 조회

create table subject (			# 'subject' table 생성
    subject_cd varchar(10),
    subject_name varchar(10) unique,
    subject_desc text,
    professor_id int unsigned not null,
    create_dt timestamp default now(),
    modify_dt timestamp default now(),
    primary key(subject_de),
    foreign key(professor_id) references professor(professor_id) on update cascade
    # on update cascade: 상위 테이블의 professor_id 값이 변경될 때 하위 테이블의 professor_id 값도 변경
);
show tables;		# table 목록 조회
desc subject;		# 'subject' table 조회
좌측의 Database Navigator의 'root@MySQL > Databases > dbname > Tables'에서
마우스 오른쪽을 클릭하여 '다이어그램 보기'를 하면 다음과 같은 화면이 나오고,
여기서 테이블 간의 관계를 확인할 수 있다.

0-1-3. 데이터베이스 테이블 수정
# 'student' table에 'student_age' column 추가
alter table student add column student_age int default 20;
desc student;		# 'student' table 조회

alter table student modify column student_address varchar(70) not null;
# 'student' table의 'student_address' column 수정
desc student;		# 'student' table 조회

# 'student' table의 'student_age' column 삭제
alter table student drop column student_age;
desc student;		# 'student' table 조회
0-1-4. 데이터베이스 테이블 삭제
database의 table을 삭제할 때, 다른 테이블을 참조하는 경우가 있으므로, 삭제 순서가 중요하다.
참조 키가 있는 하위 테이블을 먼저 삭제한 후에, 참조 키를 기본 키로 하는 상위 테이블을 삭제한다.
drop table if exists student;		# 'student' table 삭제
# drop table if exists professor;	# 'professor' table 삭제 -> 오류 발생
drop table if exists subject;		# 'subject' table 삭제
drop table if exists professor;		# 'professor' table 삭제
show tables;				# table 목록 조회
0-1-5. 데이터베이스 삭제
drop databases if exists dbname;	# 'dbname' database 삭제
show databases;				# database 목록 조회
1. DCL
1-1. DCL(Data Control Language)
DCL은 데이터의 보안(계정), 무결성, 회복 등을 제어하는 명령어를 말한다.
주로 데이터베이스에 접근하거나 객체에 권한을 부여하는 등의 기능에 사용한다.
1-2. 사용자 정보 조회
사용자 정보와 관련된 테이블은 'mysql' database에 저장되어 있다.
use mysql; # 'mysql' database 사용
show tables; # table 목록 조회
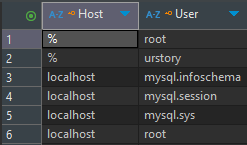
select * from user; # 'user' table의 모든 column 조회(DML)
desc user; # 'user' table 조회
여기서 'root' 계정이 두 개지만, 'Host'와 'User' column의 조합을 통해 식별할 수 있다.

1-3. 사용자 계정 생성 및 수정, 삭제
1-3-1. 사용자 계정 생성
# localhost에서만 접속 가능한 'test' 계정 생성
create user 'test'@localhost identified by 'test1234';
select * from user;		# 'user' table의 모든 column 조회

# 모든 ip에서 접속 가능한 'test1' 계정 생성
create user 'test1'@'%' identified by 'test1234';
select * from user;		# 'user' table의 모든 column 조회
1-3-2. 사용자 비밀번호 수정
set password for 'test1'@'%' = 't1234'; # 'test1'의 비밀번호 수정
1-3-3. 사용자 계정 삭제
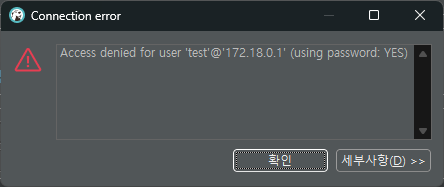
drop user 'test'@localhost;		# localhost에서 접속 가능한 'test' 계정 삭제
select * from user;			# 'user' table의 모든 column 조회
'test'@localhost 계정은 접속이 불가능하지만, 'test1'@'%' 계정은 정상적으로 접속할 수 있다.

1-4. 사용자 권한
1-4-1. 사용자 권한 부여
사용자에게 권한을 부여하기 위한 명령어는 'grant'를 사용한다.
# examplesdb의 모든 table에 대한 모든 권한을 'test1'@'%'에게 부여
grant all privileges on examplesdb.* to 'test1'@'%';
2. DML
2-1. DML(Data Manipulation Language)
DML은 table의 데이터를 삽입, 조회, 수정, 삭제하는 명령어를 말한다.
2-2. 테이블 생성
create table mytable (		# 'mytable' table 생성
    id int unsigned auto_increment,
    name varchar(10) not null unique,
    phone varchar(20),
    series varchar(50),
    primary key(id)
);

show tables;		# table 목록 조회
desc mytable;		# 'mytable' table 조회
2-3. 데이터 삽입
insert mytable (name, phone, series)	# 'mytable' table의 name, phone, series 속성에 대해
    values('name1', '1111', '11');	# 각 속성의 값이 'name1', '1111', '11'인 column 생성
insert mytable (name, phone, series)	# 'mytable' table의 name, phone, series 속성에 대해
    values('name2', '2222', '22');	# 각 속성의 값이 'name2', '2222', '22'인 column 생성
insert mytable (name, phone, series)	# 'mytable' table의 name, phone, series 속성에 대해
    values('name3', '3333', '33');	# 각 속성의 값이 'name3', '3333', '33'인 column 생성
2-4. 데이터 조회
select * from mytable;		# 'mytable'의 모든 column 조회

select
    id
  , name
  , phone
  , series			# id, name, phone, series 속성에 대해 조회
from mytable			# 'mytable' table에서
where 1=1			# True이고,
  and name = 'name1'		# name의 값이 'name1'이고,
  and phone = '1111'		# phone의 값이 '1111'인 레코드
;
2-5. 데이터 수정
update mytable			# 'mytable' table에서
  set phone = '1111'		# phone 속성의 값을 '1111'으로 수정
where 1=1			# True이고,
  and name = 'name1'		# name 속성의 값이 'name1'이고,
  and phone = '7777'		# phone 속성의 값이 '7777'이고,
  and series = '11'		# series 속성의 값이 '11'인 레코드에 대해
;

select * from mytable;		# 데이터 수정 확인
2-6. 데이터 삭제
delete from mytable		# 'mytable' table에서 삭제
where 1=1			# True이고,
  and name = 'name3'		# name 속성의 값이 'name3'인 레코드
;

select * from mytable;		# 데이터 삭제 확인

delete from mytable;		# 'mytable' table의 모든 데이터 삭제
3. MySQL 심화
3-1. MySQL Sample Database
MySQL Tutorial 사이트에서 샘플 데이터를 다운로드하여 실행한다.
3-2. 데이터 조회
SELECT 문을 통해 데이터를 조회할 때, order by문을 이용하여 원하는 정보를 쉽게 볼 수 있다.
이때, 오름차순은 ASC, 내림차순은 DESC로 작성한다.
정렬은 많은 속성에 대해 적용할 수 있다. 이때, 앞에서부터 정렬을 진행한다.
또한, as문을 통해 별칭을 지정하여 결과를 출력할 수 있다.
SELECT
    country as Country			# Country(country 속성)
  , creditLimit as Credit Limit		# Credit Limit(creditLimit 속성)
  , customerName as Name		# Name(customerName 속성)
  , phone as Phone			# Phone(phone 속성)
  , city as City			# City(city 속성)에 대한 데이터 조회
FROM customers				# 'customers' table의
WHERE 1=1
  and country = 'USA' or country = 'Australia'	# country 속성의 값이 'USA'이거나 'Australia'이고,
  and creditLimit > 50000		# creditLimit 속성의 값이 50000 초과이고,
  and creditLimit <= 100000		# creditLimit 속성의 값이 100000 이하이고,
  and city like 'N%'		# city 속성의 값이 N으로 시작하는 레코드에 대하여
order by country ASC,			# country 속성에 대해 오름차순으로,
    creditLimit DESC			# creditLimit 속성에 대해 내림차순으로 정렬
;
'SK네트웍스 Family AI캠프 10기 > Daily 회고' 카테고리의 다른 글
| 11일차. Git & Streamlit & Crawling (0) | 2025.01.21 |
|---|---|
| 10일차. DML & Streamlit (0) | 2025.01.20 |
| 8일차. MySQL & 데이터베이스 & DDL (0) | 2025.01.16 |
| 7일차. 클래스 & 라이브러리 (0) | 2025.01.15 |
| 6일차. 함수 & 클래스 (0) | 2025.01.14 |


