더보기
10일 차 회고.
주말이 너무 짧았다. 쉬기만 했는데 눈 깜짝할 사이에 주말이 끝나서 힘들기도 했고, 공부나 프로젝트 관련하여 활동을 회의만 하고 그 외에는 아무것도 하지 않은 것 같아서 반성하고 있다. 그리고 아침에 입실체크를 까먹고 40분이 돼서야 했다. 내일부터는 까먹지 말고 오자마자 해야겠다. 또, 첫 단위 프로젝트를 시작하게 되었는데 가위바위보를 이겨서 팀장이 됐다. 팀 레퍼지토리에서 팀원들도 초대하고 브랜치도 생성했는데 main과 develop 브랜치는 팀장만 사용한다고 해서 부담감이 생겼다.
0. 복습
0-1. 'urstory' 계정에 'classicmodels' database에 대한 권한 부여
# root@MySQL
use mysql;			# 'mysql' database 사용
show tables;			# 'mysql' database의 table 조회

select * from user;		# 'user' table의 모든 데이터 조회

# 'urstory' 계정에 'classicmodels' database의 모든 table에 대한 모든 권한(생성, 수정, 삭제 등) 부여
grant all privileges on classicmodels.* to 'urstory'@'%';
# urstory@MySQL
show databases;			# database 목록 조회

use classicmodels;		# 'classicmodels' database 사용
show tables;			# 'classicmodels' databae의 table 조회
1. DML
1-0. 'classicmodels' database

- offices - employees : 1:N
- employees - employees : 1:N
- 상사 - 부하 관계로, 한 명의 상사가 여러 명의 부하를 가질 수 있음
- employees - customers : 1:N
- customers - orders : 1:N
- orders - orderdetails : 1:N
- productlines - products : 1:N
- products - orderdetails : 1:N
- customers - payments : 1:N
1-1. Join
Join은 두 개의 테이블을 서로 묶어서 데이터를 조회하는 것을 말한다.
SELECT
	a.orderNumber
  , a.status
  , a.orderDate
  , b.customerName
FROM orders a LEFT JOIN customers b		# A INNER JOIN B: A를 기준으로 B와의 조건을 만족하는 테이블 조회
ON a.customerNumber = b.customerNumber		# INNER JOIN의 조건
ORDER BY a.orderDate DESC			# a(orders)의 orderDate 속성을 기준으로 내림차순 정렬
1-2. Group by
Group by는 데이터를 조회하거나 통계적인 데이터를 추출할 때 주로 사용한다.
SELECT
    avg(priceEach)			# 상품별 가격의 평균
  , count(orderNumber)			# 상품별 주문 수
  , productCode				# 상품정보(unique)
FROM orderdetails
GROUP BY productCode
;
1-3. 실습
# 돈을 가장 많이 쓴 고객
SELECT
    b. customerNumber
  , sum(a.quantityOrdered * a.priceEach) as money_of_product
FROM orderdetails od
LEFT JOIN orders o
ON od.orderNumber = o.orderNumber
GROUP BY o.customerNumber
ORDER BY money_of_product DESC
;
2. Visual Studio Code(Python) - MySQL 연결
2-0. 가상환경 생성
py -3.13 -m venv .venv
.\.venv\Scripts\activate
python -m pip install --upgrade pip
pip install jupyter
2-1. Connection 객체 생성
pip install PyMySQL # connection 객체 구축 드라이버
import pymysql

connection = pymysql.connect(
    host = "localhost",
    user = "urstory",
    password = "u1234",
    database = "classicmodels",
    charset = "utf8"
)
2-2. Cursor
cursor = connection.cursor()	# cursor 생성

sql = "show tables"		# sql 명령문 작성
cursor.execute(sql)		# cursor를 통해 sql 명령문 실행
cursor.fetchall()		# cursor에 저장된 결과 출력
import pymysql

cursor = connection.cursor(pymysql.cursors.DictCursor)	# cursor의 결과를 Dictionary 형태로 출력

sql = """
SELECT
    customerNumber
  , customerName
  , phone
FROM customers
;
"""

cursor.execute(sql)
cursor.fetchall()
위 결과를 표 형태로 보기 쉽게 결과를 출력하기 위해서는 pandas 라이브러리를 사용할 수 있다.
! pip install pandas		# pandas 설치

import pandas as pd

pd.DataFrame(result)
2-3. Streamlit
pip install streamlit		# streamlit 설치

streamlit hello			# streamlit demo 실행
'.streamlit' 폴더를 만든 후, 그 안에 'secrets.toml' 파일을 생성한다.

# secrets.toml
[connections.mydb]
dialect = "mysql"
username = "urstory"
password = "u1234"
host = "localhost"
database = "classicmodels"
pip install SQLAlchemy
pip install mysqlclient
# page01.py
import streamlit as st

conn = st.connection("mydb", type="sql", autocommit=True)	# connection 객체 생성

sql = """
SELECT
    customerNumber
  , customerName
  , phone
FROM customers
;
"""

result = conn.query(sql=sql, ttl=3600)
st.dataframe(result)
streamlit run page01.py
3. Streamlit
3-1. Text elements
import streamlit as st

st.title("Streamlit")					# title

st.header("Tutorial")					# header

st.subheader("Smile :sunglasses:")			# subheader & emoji

st.text("This is streamlit.")				# text

st.markdown("Streamlit **supports Markdown**.")		# markdown

sample_python_code = """
def add(a, b):
    return a + b
"""
st.code(sample_python_code, language="python")		# code

st.latex(r'''						# latex
        a + ar + a r^2 + a r^3 + \cdots + a r^{n-1} =
         \sum_{k=0}^{n-1} a r^k =
         a \left(\frac{1-r^{n}}{1-r}\right)
         ''')

st.caption("Caption")					# caption

3-2. Data elements
import random
import pandas as pd
import streamlit as st

df = pd.DataFrame(
    {
        "name": ["Roadmap", "Extras", "Issues"],
        "url": ["https://roadmap.streamlit.app", "https://extras.streamlit.app", "https://issues.streamlit.app"],
        "stars": [random.randint(0, 1000) for _ in range(3)],
        "views_history": [[random.randint(0, 5000) for _ in range(30)] for _ in range(3)],
    }
)

st.title('Dataframe')
st.dataframe(
    df,
    column_config={
        "name": "App name",
        "stars": st.column_config.NumberColumn(
            "Github Stars",
            help="Number of stars on GitHub",
            format="%d ⭐",
        ),
        "url": st.column_config.LinkColumn("App URL"),
        "views_history": st.column_config.LineChartColumn(
            "Views (past 30 days)", y_min=0, y_max=5000
        ),
    },
    hide_index=True,
)

import pandas as pd
import streamlit as st
# Cache the dataframe so it's only loaded once
@st.cache_data
def load_data():
return pd.DataFrame(
{
"first column": [1, 2, 3, 4],
"second column": [10, 20, 30, 40],
}
)
df = load_data()
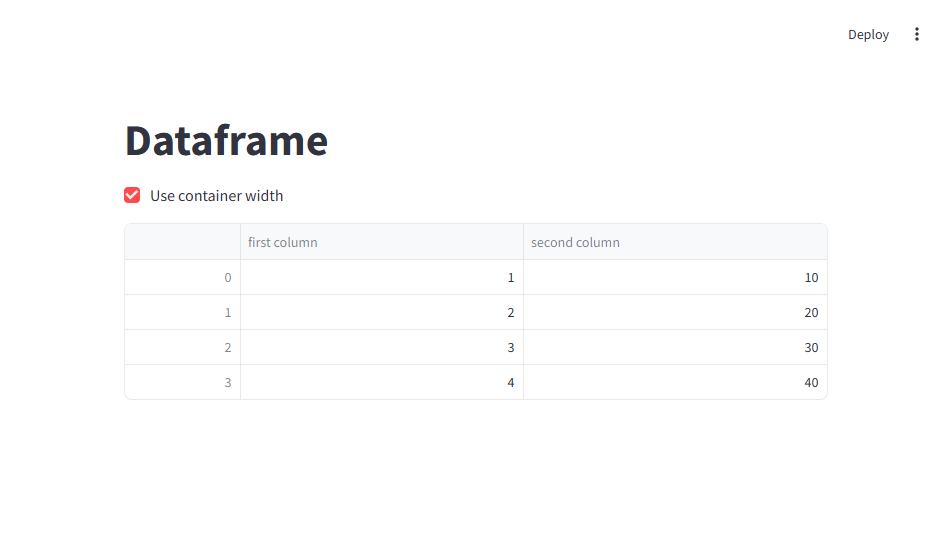
st.title('Dataframe')
# Boolean to resize the dataframe, stored as a session state variable
st.checkbox("Use container width", value=False, key="use_container_width")
# Display the dataframe and allow the user to stretch the dataframe
# across the full width of the container, based on the checkbox value
st.dataframe(df, use_container_width=st.session_state.use_container_width)

'SK네트웍스 Family AI캠프 10기 > Daily 회고' 카테고리의 다른 글
| 12일차. Crawling (0) | 2025.01.22 |
|---|---|
| 11일차. Git & Streamlit & Crawling (0) | 2025.01.21 |
| 9일차. DCL & DML (0) | 2025.01.17 |
| 8일차. MySQL & 데이터베이스 & DDL (0) | 2025.01.16 |
| 7일차. 클래스 & 라이브러리 (0) | 2025.01.15 |


